Ear Pulse Oximeter Probe Guide
How to use an ear pulse oximeter probe


Standard US shipping included (We ship internationally daily)
Product Description
Using a pulse oximeter ear probe sounds straight forward, but in reality it is not easy for some patients. For an oximeter probe to work properly, the signal must be stable and strong enough for the probe to work. A good signal requires: sufficient blood flow and stable contact at the point of measurement. The blood flow at the ear is normally lower than other part of the body. Furthermore, an ear is located at the outer most part of the head; a slight movement of the head would be amplified at the ear.
If you encounter problems, try different parts of the ear and follow the guidelines below.
If you suspect that your probe is not working, clip the probe onto your finger to see if you can get an accurate reading. If you have a good reading, then either you are not using the probe correctly or the blood perfusion at the ear is too low for your oximeter/probe.
If not used properly, you would get a "finger out" or "error" message. Sometimes, you would just get a low reading. The key to have good contact on the ear as an unstable probe would not work.
Follow the following procedure when using an ear oximeter probe:
- Use an alcohol pad to massage the patient's earlobe gently for 10 to 20 seconds. Mild erythema (redness) indicates adequate blood perfusion. Ear is very susceptible to vasoconstriction due to cold or hypovolemia.
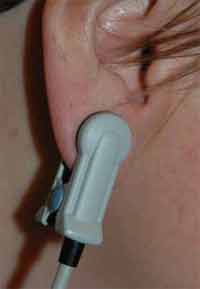
- Attach the ear probe to the patient's earlobe or other visible part of the ear (pinna). Center the ear probe with the LED side toward the head on the lower, fleshy part of the ear. The part has to have enough blood flow to give a good and strong reading.
- Be certain that the LED light detector is fully covered by the ear tissue and not exposed to light in the room. Outside light would interfere with the signal.
- Do not press the clip down as this would restrict the blood flow at the point of contact.
- Do not position the ear probe where cartilage is present or where it will press against the side of the head.
- For measurement for prolonged or exercise testing, an ear probe stabilizer may be required.
- Adhesive disks may be used to better secure the probe.
- Some agents containing 10-30% methy salicylate and 2-3% methol can produce local vasodilation, thereby increasing blood perfusion. They can be used to help and are available over the counter.
- Leave the probe in place for 3+ minutes until the reading stabilizes. Or take three separate readings and take the average. Make sure you massage the patient's ear each time.
- For small babies and children, the ear probe can be used on the cheek from outside to inside the mouth. Make sure the probe is clean.
Using a pulse oximeter ear probe sounds straight forward, but in reality it is not easy for some patients. For an oximeter probe to work properly, the signal must be stable and strong enough for the probe to work. A good signal requires: sufficient blood flow and stable contact at the point of measurement. The blood flow at the ear is normally lower than other part of the body. Furthermore, an ear is located at the outer most part of the head; a slight movement of the head would be amplified at the ear.
If you encounter problems, try different parts of the ear and follow the guidelines below.
If you suspect that your probe is not working, clip the probe onto your finger to see if you can get an accurate reading. If you have a good reading, then either you are not using the probe correctly or the blood perfusion at the ear is too low for your oximeter/probe.
If not used properly, you would get a "finger out" or "error" message. Sometimes, you would just get a low reading. The key to have good contact on the ear as an unstable probe would not work.
Follow the following procedure when using an ear oximeter probe:
- Use an alcohol pad to massage the patient's earlobe gently for 10 to 20 seconds. Mild erythema (redness) indicates adequate blood perfusion. Ear is very susceptible to vasoconstriction due to cold or hypovolemia.
- Attach the ear probe to the patient's earlobe or other visible part of the ear (pinna). Center the ear probe with the LED side toward the head on the lower, fleshy part of the ear. The part has to have enough blood flow to give a good and strong reading.
- Be certain that the LED light detector is fully covered by the ear tissue and not exposed to light in the room. Outside light would interfere with the signal.
- Do not press the clip down as this would restrict the blood flow at the point of contact.
- Do not position the ear probe where cartilage is present or where it will press against the side of the head.
- For measurement for prolonged or exercise testing, an ear probe stabilizer may be required.
- Adhesive disks may be used to better secure the probe.
- Some agents containing 10-30% methy salicylate and 2-3% methol can produce local vasodilation, thereby increasing blood perfusion. They can be used to help and are available over the counter.
- Leave the probe in place for 3+ minutes until the reading stabilizes. Or take three separate readings and take the average. Make sure you massage the patient's ear each time.
- For small babies and children, the ear probe can be used on the cheek from outside to inside the mouth. Make sure the probe is clean.
Shipping Information
Shipping Weight: 0.00 Pounds
Availability: In stock! Ready to ship.
Shipping Cost: US Shipping included! Int'l Shipping calculated at checkout
In-stock items are normally shipped within 24-48 hours on business days. For special handling or overnight shipping, please call us at 281-664-1209.
Manufacturer Information
Manufacturer:
Item Code:
Product belongs to these categories...
Pulse Oximeters
